PostgreSQL is a widely used relational database because of its basic to advanced features. One of the notable features of Postgres is that it is compatible with various operating systems, such as Windows, Linux, and MacOS. It assists users in storing, managing, and retrieving large amounts of data efficiently. To get the maximum of Postgres features, it is necessary to learn how to start or stop the Postgres server on ubuntu.
This post is going to present a step-by-step guide on how to start or stop the PostgreSQL server on the Ubuntu operating system.
How to Start or Stop PostgreSQL Server on Ubuntu?
In Ubuntu, the Postgres server can be started or stopped using various methods. In this article a couple of well-known methods will be discussed to start or restart the Postgres server on Linux (Ubuntu):
- Method 1: Using the “systemctl” Command
- Method 2: Using the “/etc/init.d/postgresql” which is the script that systemctl calls.
Method 1: Start and Stop Postgres Server Using the “systemctl” Command
Here are the steps to start or stop the Postgres server on ubuntu using the “systemctl” command:
Step 1: Review the Postgres Status
Open the terminal and execute the following “sudo” command to review the current status of the Postgres server:
sudo systemctl status postgresql

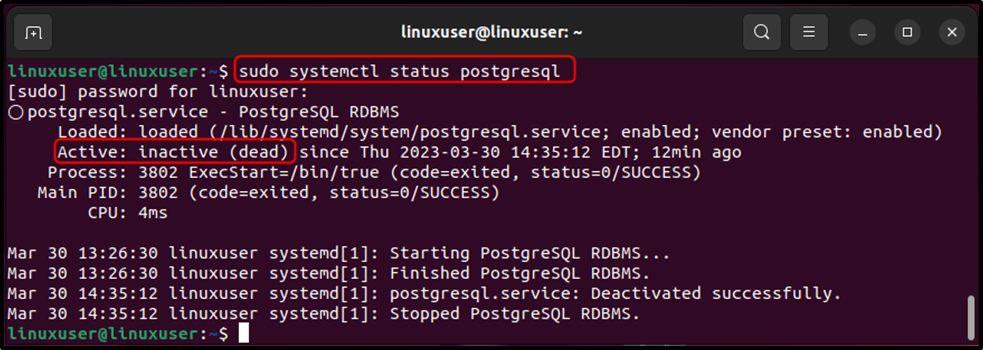
The above snippet shows that the Postgres server is currently deactivated.
Step 2: Start the Postgres Server
Use the below-given “sudo” command with the “start” option to begin the Postgres server:
sudo systemctl start postgresql

The output illustrates that the Postgres server has been initiated successfully.
Step 3: Verify the Postgres Status
Use the below-given “sudo” command along with the “status” option to verify the Postgres status:
sudo systemctl status postgresql

The output confirms that the Postgres Server has been activated successfully.
Step 4: Stop the Postgres Server
Type the “systemctl” command followed by the “stop” option to halt the Postgres server:
sudo systemctl stop postgresql

The output shows that the Postgres server has been stopped successfully.
Step 5: Confirm Postgres Status
Type the “systemctl” command followed by the “status” option to confirm the Postgres status:
sudo systemctl status postgresql

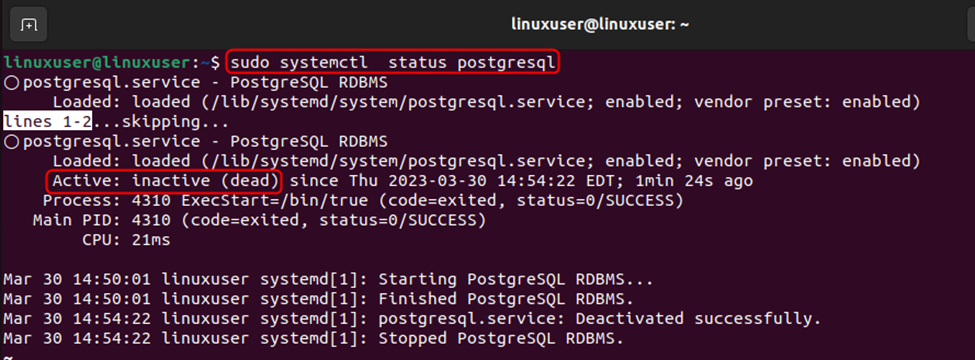
The output proves that the Postgres server has been deactivated successfully.
Method 2: Start and Stop Postgres Server Using “/etc/init.d/postgresql”
To start or stop a Postgres server on Ubuntu, follow the below-given instructions:
Step 1: Review the Postgres Status
Open the terminal and execute the following command to review the current status of the Postgres server:
/etc/init.d/postgresql status

The above snippet states that the Postgres server is not active yet.
Step 2: Start the Postgres Server
Use the “/etc/init.d/postgresql” command with the start option to initiate the Postgres server:
/etc/init.d/postgresql start

The output shows that the Postgres server has been started successfully.
Step 3: Verify the Postgres Status
Use the “/etc/init.d/postgresql” command with the “status” option to verify the Postgres status:
/etc/init.d/postgresql status

The output demonstrates that the Postgres Server has been activated/started successfully.
Step 4: Stop the Postgres Server
Type the “/etc/init.d/postgresql” command followed by the “stop” option to halt the Postgres server:
/etc/init.d/postgresql stop

The output shows that the Postgres server has been stopped successfully.
Step 5: Confirm Postgres Status
Type the “/etc/init.d/postgresql” command followed by the “status” option to confirm the Postgres status:
/etc/init.d/postgresql status

The output proves that the Postgres server has been stopped successfully.
Conclusion
In Ubuntu, “/etc/init.d/postgresql” and the “systemctl” commands are used with the “start” or “stop” option to activate or deactivate the Postgres server, respectively. The status of the Postgres server can be confirmed by executing these commands with the “status” option. This article has presented a step-by-step guide on how to start or stop the PostgreSQL server on the Ubuntu operating system.


